Syntax: CERT ADD [nickname] [fingerprint]
CERT DEL [nickname] fingerprint
CERT LIST [nickname]
Modifies or displays the certificate list for your nick.
If you connect to IRC and provide a client certificate with a
matching fingerprint in the cert list, you will be
automatically identified to services. Services Operators
may provide a nick to modify other users’ certificate lists.
Examples:
CERT ADD
Adds your current fingerprint to the certificate list and
automatically identifies you when you connect to IRC
using this fingerprint.
CERT DEL
Removes the fingerprint from your certificate list.
CERT LIST
Displays the current certificate list.
Automatically Identifying Using SSL + CertFP
This page describes how to use SSL with a certificate fingerprint to automatically identify your registered nickname with NickServ on connect. You must have an IRC client that supports SSL with a client certificate.
Creating a Self-signed Certificate
First you need generate a self-signed certificate. We will be using OpenSSL which should be available on most Linux and BSD distributions. There are ports for other platforms including Windows.
Generate the Key and Certificate
We need to generate our certificate and key. We’ll use the openssl command with the ‘req’ option.
% openssl req -nodes -newkey rsa:2048 -keyout nick.key -x509 -days 3650 -out nick.cer
Generating a 2048 bit RSA private key
writing new private key to 'nick.key'
-----
Country Name (2 letter code) [US]:YOURCOUNTRYCODE
State or Province Name (full name) [Texas]:YOURSTATE
Locality Name (eg, city) [San Antonio]:YOURCITY
Organization Name (eg, company) [Stealth3]:YOURTEXTHERE
Organizational Unit Name (eg, section) [ISP]:IRC
Common Name (eg, YOUR name) []:YOUR NAME
Email Address []:YOURMAIL@ADDRESS
The fields you are asked to fill out here do not matter for connecting to OFTC so fill them out however you wish. (You can use other key sizes if you want, but the hash algorithm needs to be SHA-1.) You now have two files, the key in nick.key and the certificate in nick.cer. Remember to protect your key using chmod.
% chmod 400 nick.keyIf you are curious, you can have a closer look at your cert. We are mainly interested in the certificate fingerprint (CertFP). (This is not a required step, there are other ways to get the fingerprint.)
% openssl x509 -noout -fingerprint -text < nick.cerWe now combine certificate and key to a single file nick.pem (Remember to also protect this file because it now includes your private key!):
% cat nick.cer nick.key > nick.pem
% chmod 400 nick.pem
Connecting to ZEnet with your Cert
Unlisted Clients
If you are using a client that is not listed here feel free to submit a step-by-step howto about it, and we will include it. Either grab a staff member from #zenet or send a mail to our support address help@zenet.org with the information needed. Thank you.
irssi
Move the certificates you created some where safe, for example ~/.irssi/certs.
% mkdir ~/.irssi/certs
% mv nick.{key,cer,pem} ~/.irssi/certs
Now remove the current server and re-add it with the SSL flag, using your newly generated certificate. Note that we use the SSL port 6697 to connect.
/server remove irc.zenet.org
/network add ZEnet
/server add -auto -ssl -ssl_cert ~/.irssi/certs/nick.pem -ssl_verify -network ZEnet irc.zenet.org 6697
Next we need to disconnect and connect back to the server. (A /reconnect does not read the new settings we added.)
/disconnect ZEnet
/connect ZEnet
KvIRC
- Go to “Settings -> Configure KvIRC”
- Go to “Connection->advanced”
- On the Tab “SSL” check ‘Use ssl certificate’ and ‘Use SSL private key’ and point both to the nick.pem file you created.
- Change your connection settings and enable the ssl option. Also make sure it is set to connect to port 6697.
mIRC
- Go Main Options Menu -> Connect -> Options
- Click on the SSL button
- Click on the empty box below ‘Private Key File’, navigate to where you placed your nick.pem file and select it.
- Do the same for ‘Certificate Chain File’
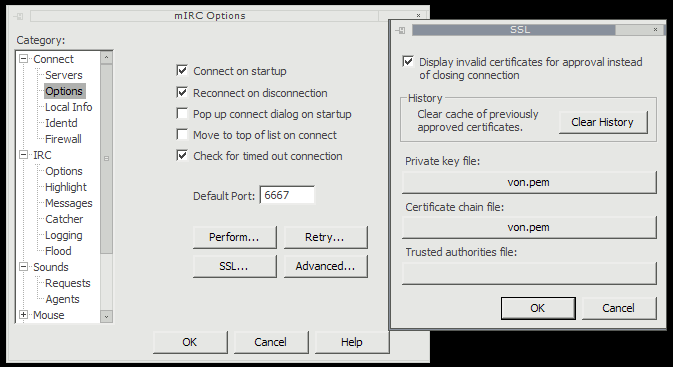
- Make sure to connect to the network over SSL. The command is ‘/server irc.zenet.org +6697’ – note the plus sign before the port number. This is what sets mIRC to connect over SSL. To save this server with the SSL settings, you can simply add the plus sign before the port number in mIRC’s server manager.
ChatZilla
- Convert the key to pkcs12: openssl pkcs12 -export -out nick.pfx -in nick.pem
- Go to the Certificate Manager. You should find that in the Preferences, Advanced Options, Encryption. Select ‘View Certificates’ and there you can import the nick.pfx you just generated
- Now connect to ZEnet using SSL and Chat**Zilla asks if you want to use the certificate for authentication. Say yes. (Note that you will have to confirm sending the certificate once for every server you connect to. As irc.zenet.org is a rotation it might ask you later again, don’t be surprised).
ZNC
- Follow the instructions found on https://wiki.znc.in/Cert
- This should not be confused with https://wiki.znc.in/Certauth which is used to authenticate your remote client to your instance of znc. You’re trying to authenticate your znc instance with ZEnet.
Quassel
Quassel settings are stored in ~/.config/quassel-irc.org/ so we can make the certs in ~/.config/quassel-irc.org/certs/ .
In the “Settings -> Configure Quassel “ menu, the “Identities” section, “Advanced” tab contains the interface to indicate the certificate.
- Load the key (~/.config/quassel-irc.org/certs/mynick.key)
- Load the certificate (~/.config/quassel-irc.org/certs/mynick.pem)
- Click OK and re-connect to the network.
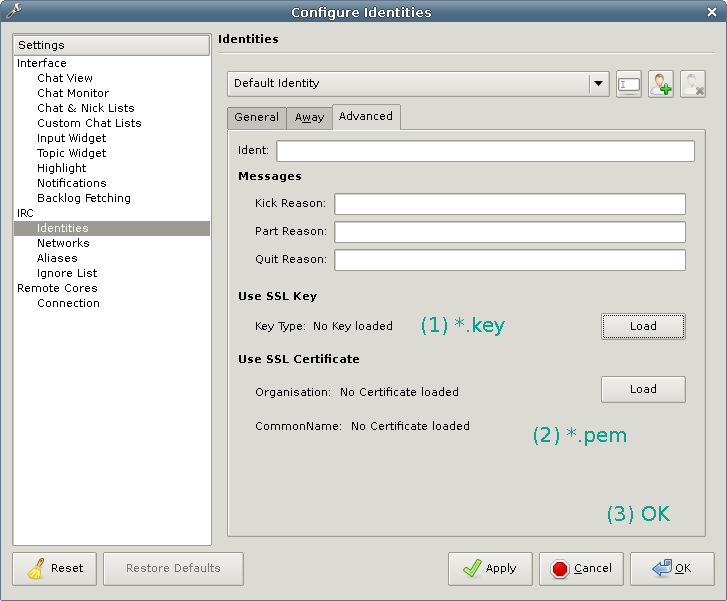
You (obviously) need to be using an SSL port for this to work. http://bugs.quassel-irc.org/projects/1/wiki#IRC-Configuration has some detail on server settings interface.
Emacs/ERC
Move the certificate you created:
% mv nick.pem ~/.ssl/Now start up Emacs and customize the tls-program variable (e.g. by calling “M-x customize-variable” and entering “tls-program”).
In order to connect with gnutls-cli, add the following entry:
gnutls-cli --priority SECURE256 --x509certfile ~/.ssl/erc_nick.pem -p %p %hIn order to connect with openssl, add the following entry:
openssl s_client -connect %h:%p -no_ssl2 -ign_eof -cert ~/.ssl/erc_nick.pem Then call “M-x erc-tls” and connect to irc.zenet.org, port 6697.
More info on using SSL in ERC can be found at the EmacsWiki.
WeeChat
Move the certificates you created somewhere safe, for example ~/.weechat/certs.
% mkdir ~/.weechat/certs
% mv nick.{key,cer,pem} ~/.weechat/certs
Now disconnect and remove the current server. Re-add it with the SSL flag, using your newly generated certificate. Note that we use the SSL port 6697 to connect.
/disconnect ZEnet
/server del ZEnet
/server add ZEnet irc.zenet.org/6697 -ssl -ssl_verify -autoconnect
/set irc.server.ZEnet.ssl_cert %h/certs/nick.pem
Exit WeeChat and connect back to the ZEnet server.
/connect ZEnet